


Twiginity: Bulk delete all your tweets for FREE
In this article, I share all details behind the making of Twiginity, from mockups to the tools used, the challenges faced and how I overcame them.


Table of contents
What is Twiginity?
Twignity is a mass tweet deleter. Easy. Plain. Simple.
There are many of these out there if you search on GitHub but they're for the most part CLI which makes them mostly usable by savvy people with a Twitter developper account.
Some people will say
❝ TweetDelete exists ❞
But you can only delete up to 3.200 tweets... to delete anything beyond that number you'd need to pay.
Note: Twitter API v1.1 will be deprecated in the few upcoming months, with the switch to v2 there will be a limit on the number of delete requests sent (50 requests / 15 min) rendering the app not as useful.
Features ✨
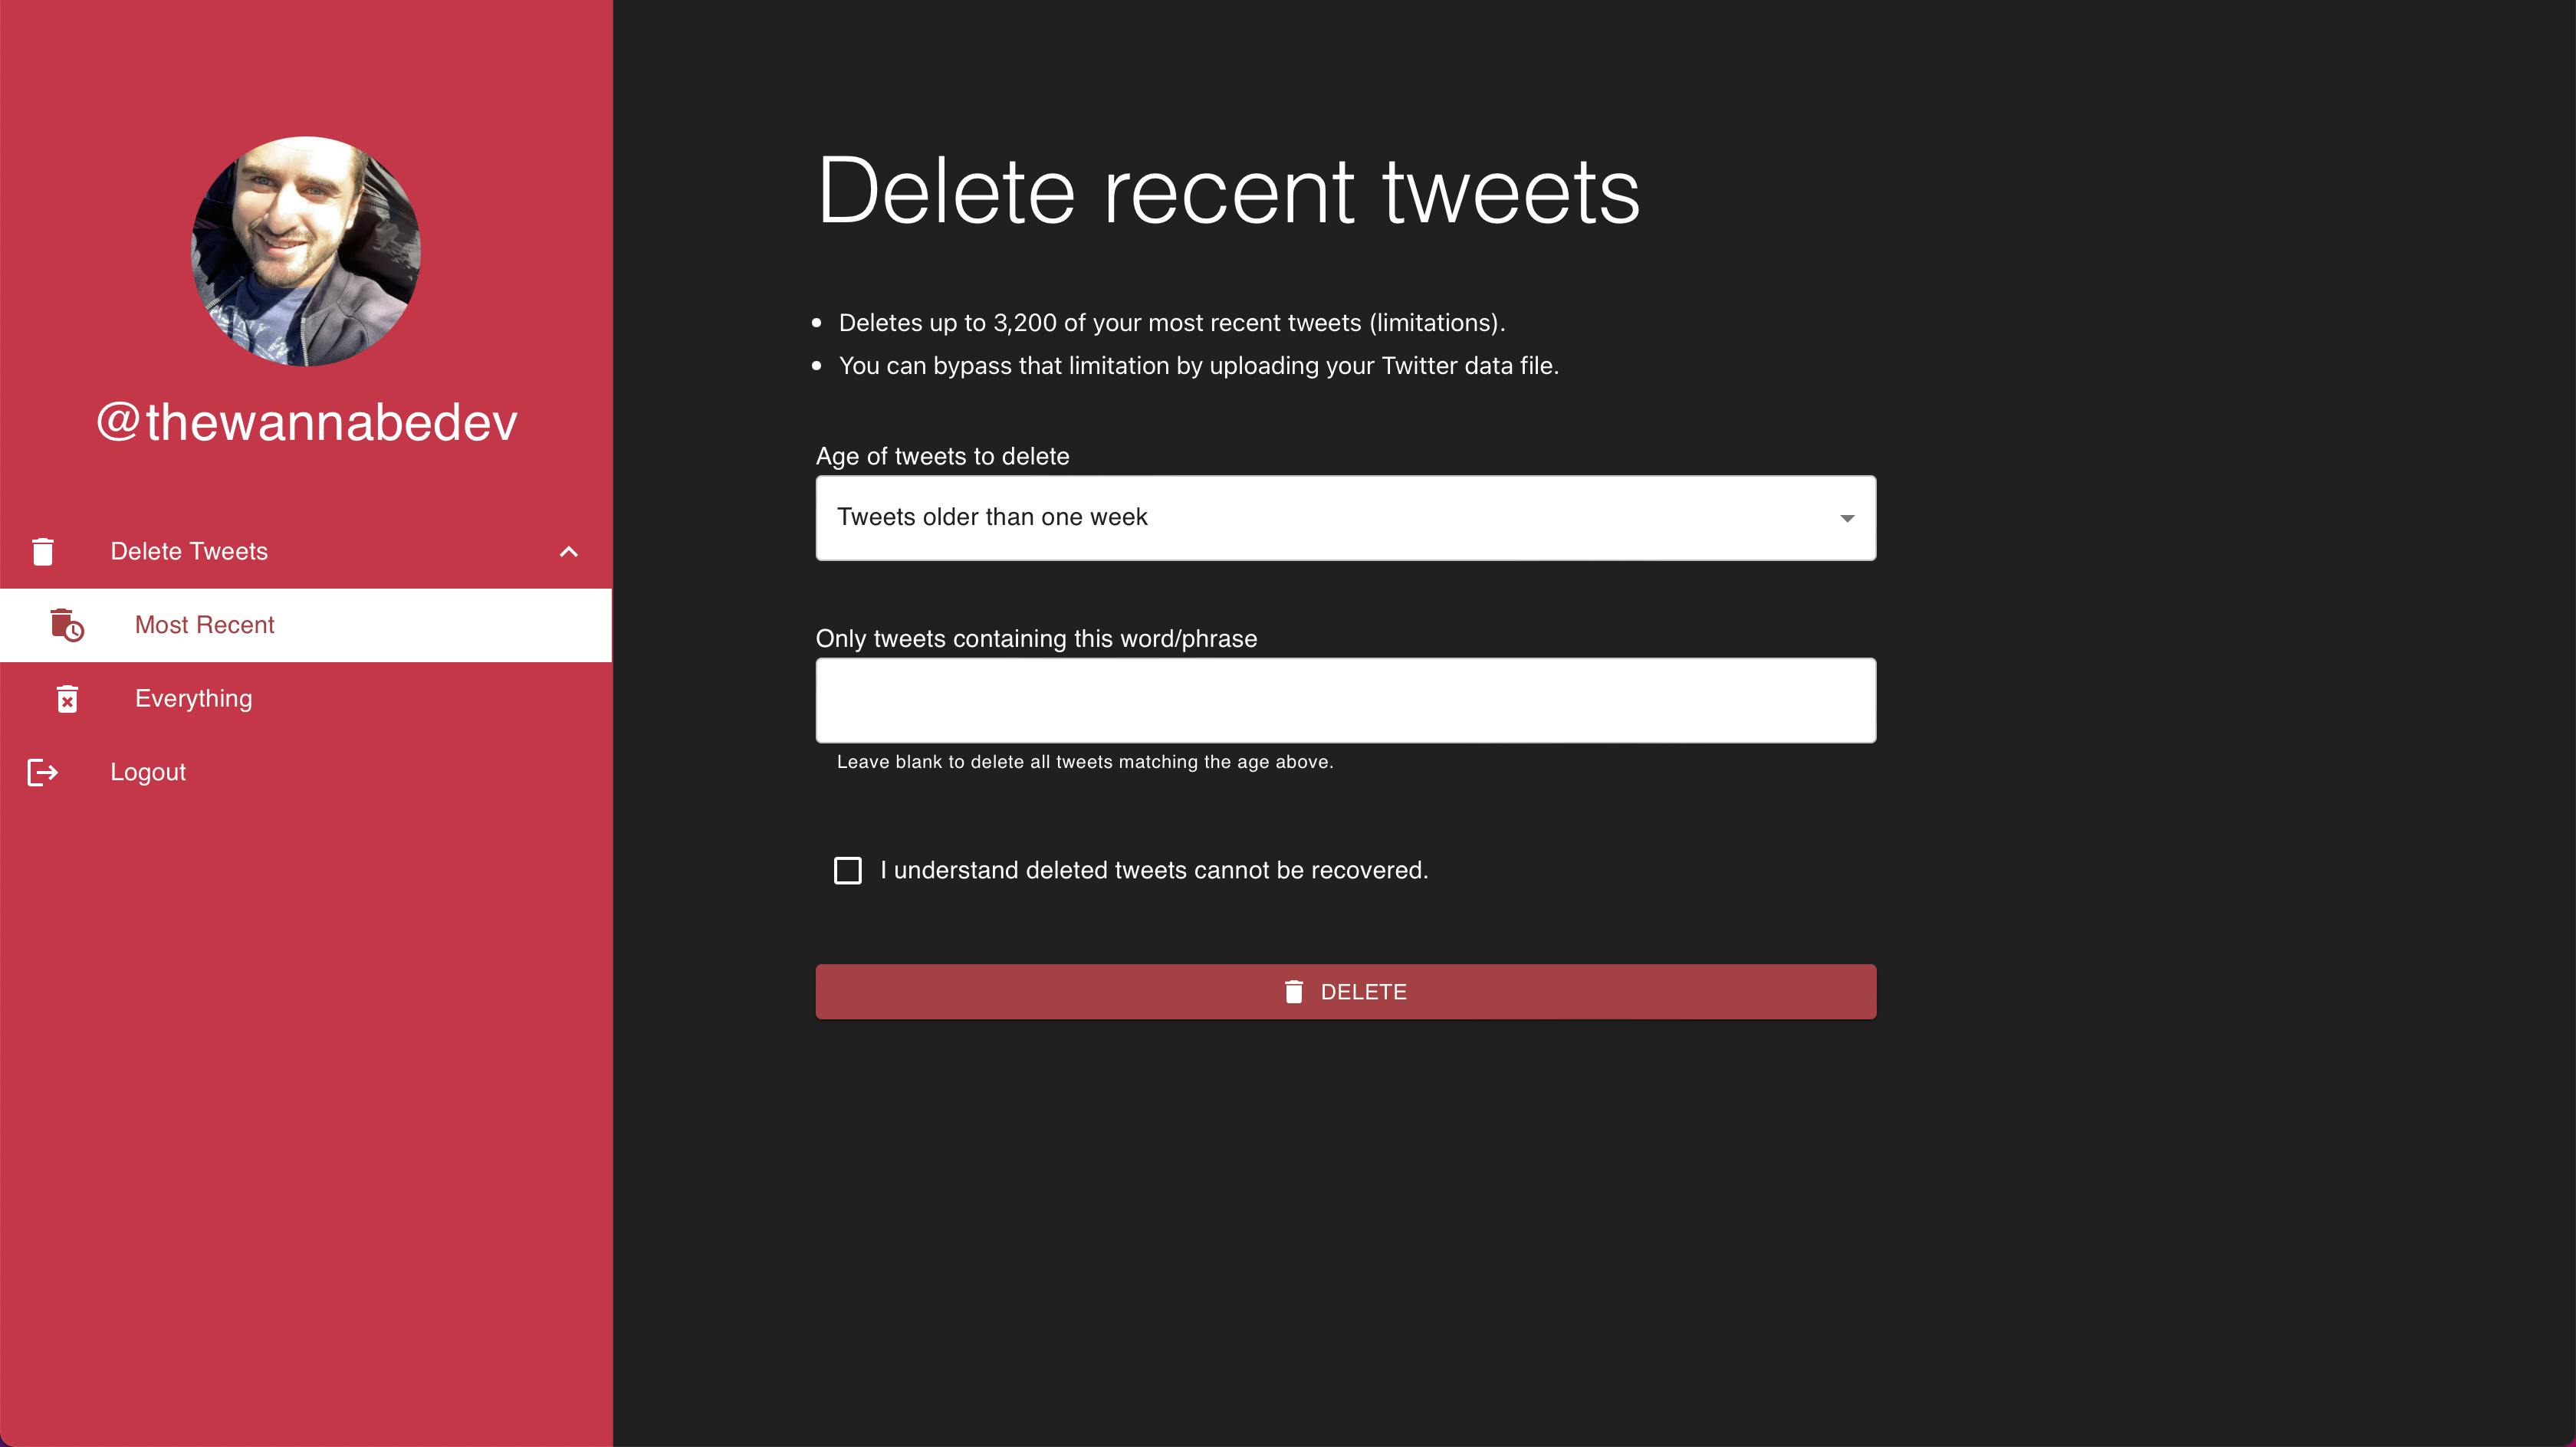
Delete the 3200 most recent tweets (this is as much as Twitter API will allow you to fetch)
Delete tweets past a certain date
Delete only tweets containing a certain keyword
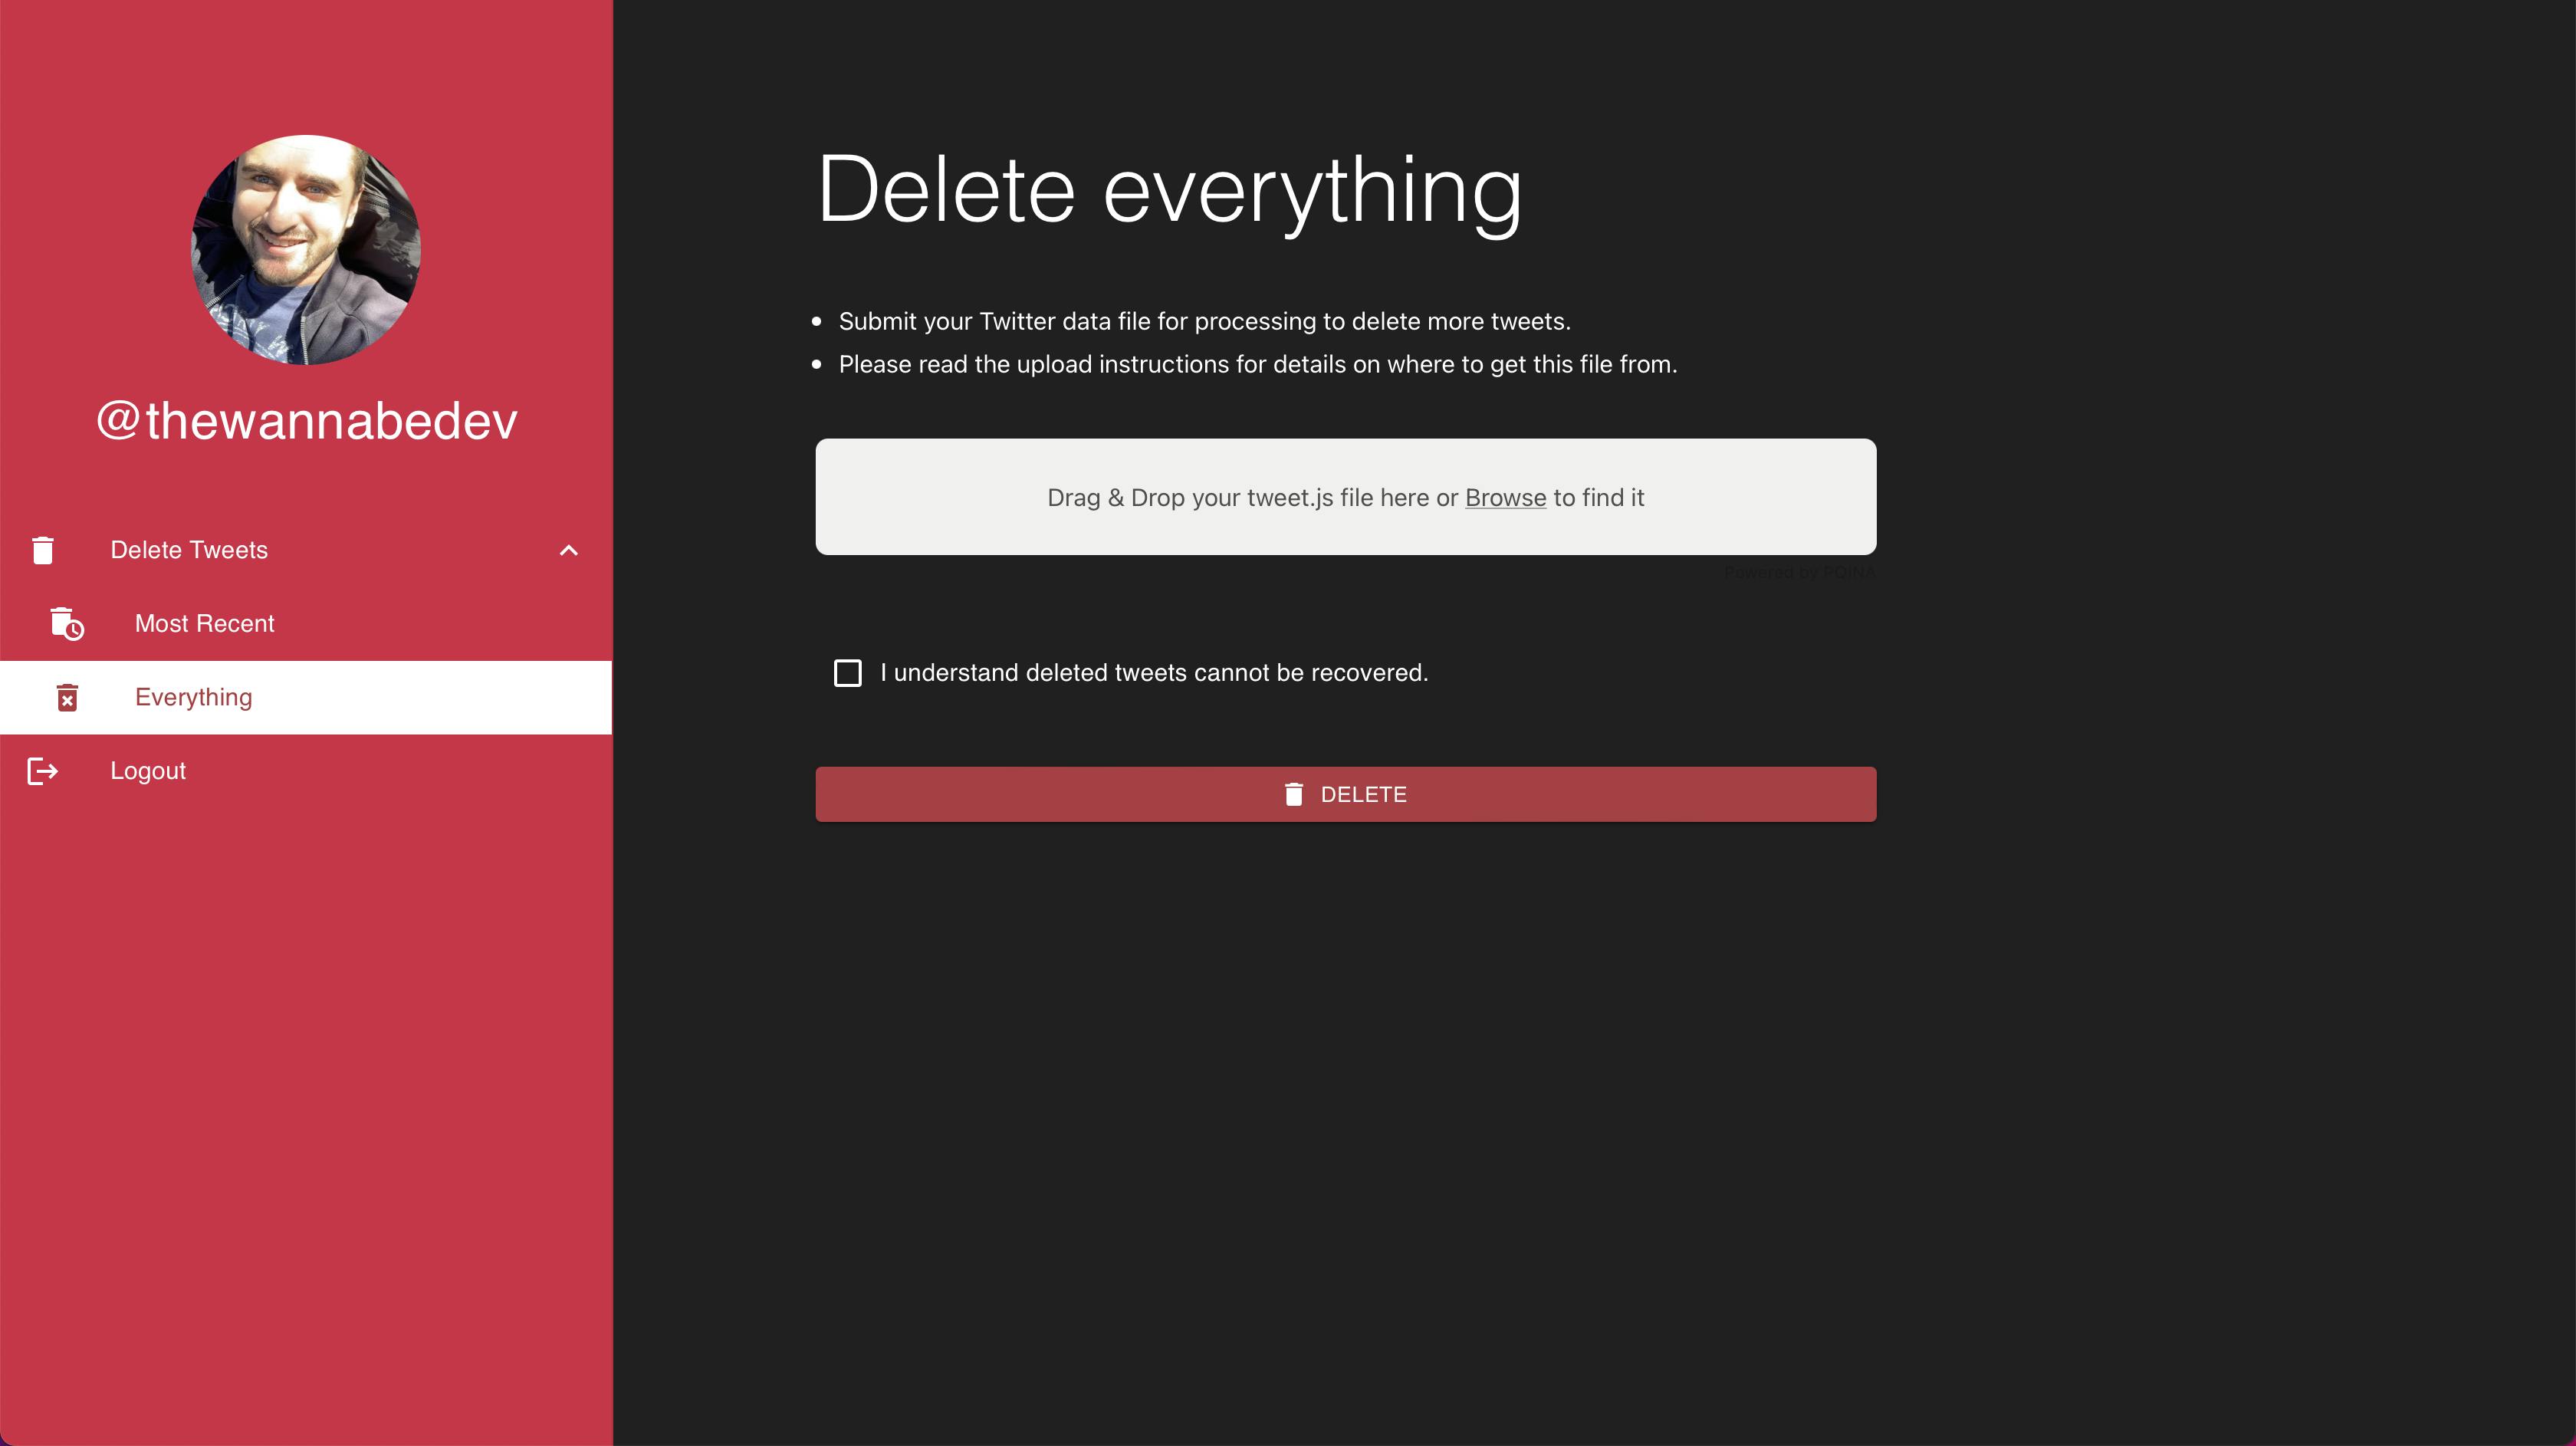
Delete all your account's tweets if you provide your tweets.js file
Design 🎨
Truthfully, I did not dwell much on the UI so I tried copying something I liked.
The result was a mashup between Hypefury & TweetDelete which turned out ok (although don't ask @gitignorer for his opinion on the accent color... he HATES it and that's why I'm keeping it 😜).
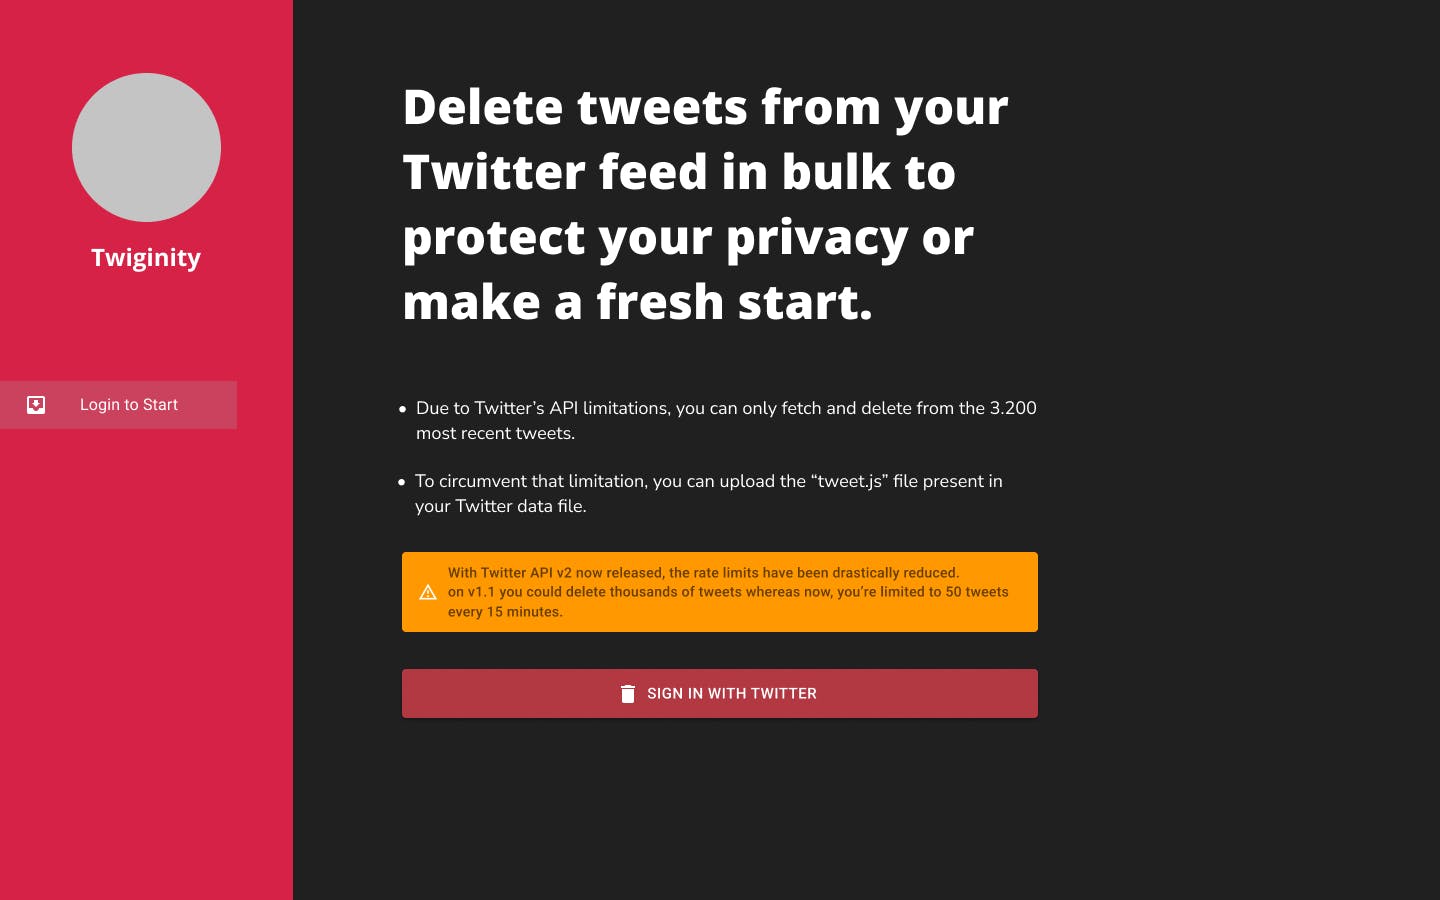
Twiginity's homepage when the user is not logged in
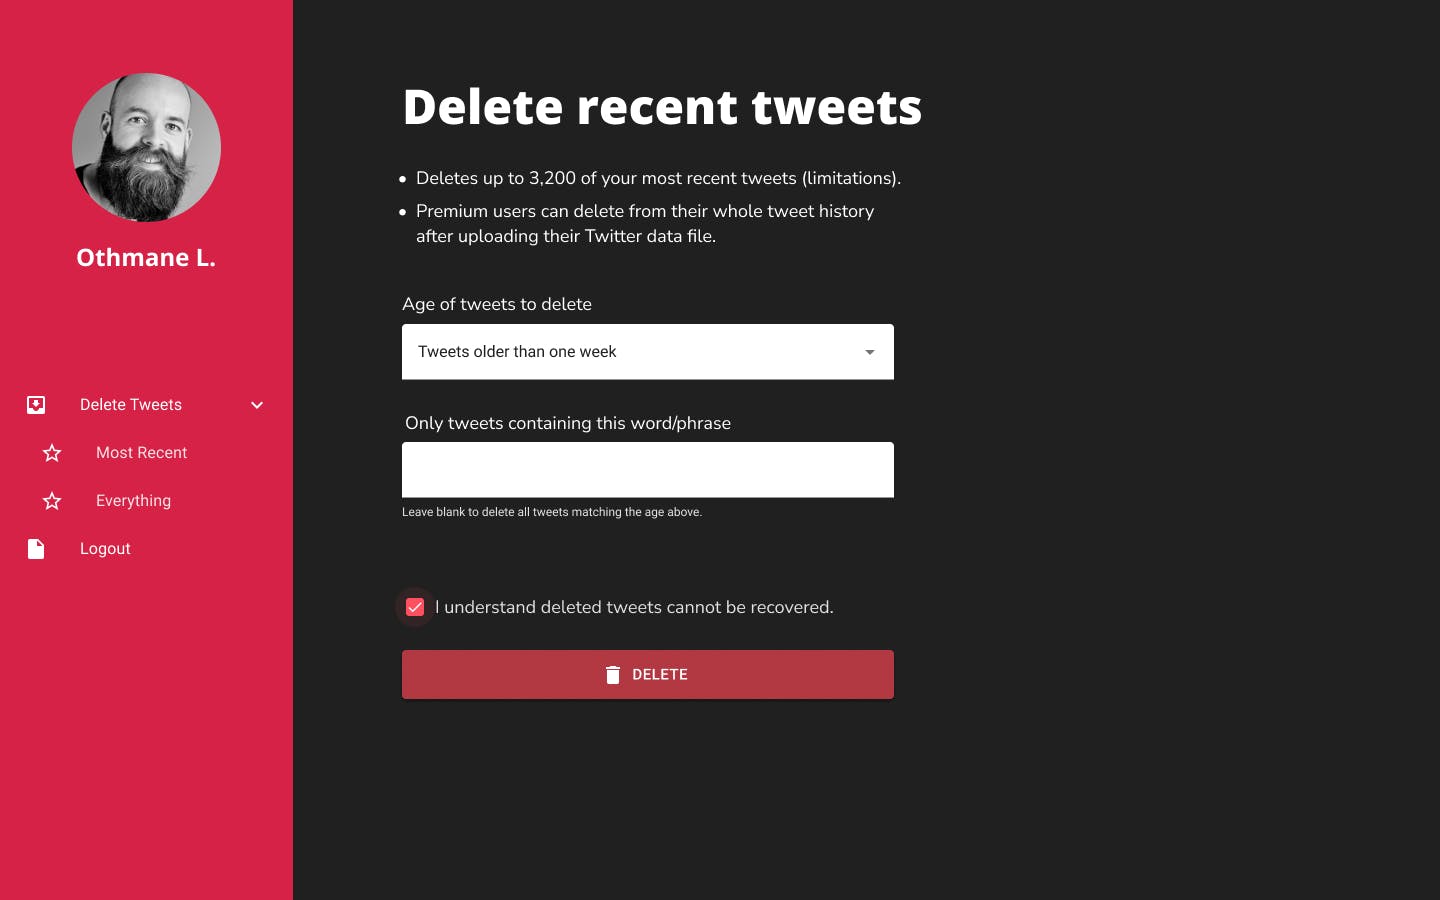
The screen that appears when the user clicks on "Most Recent"
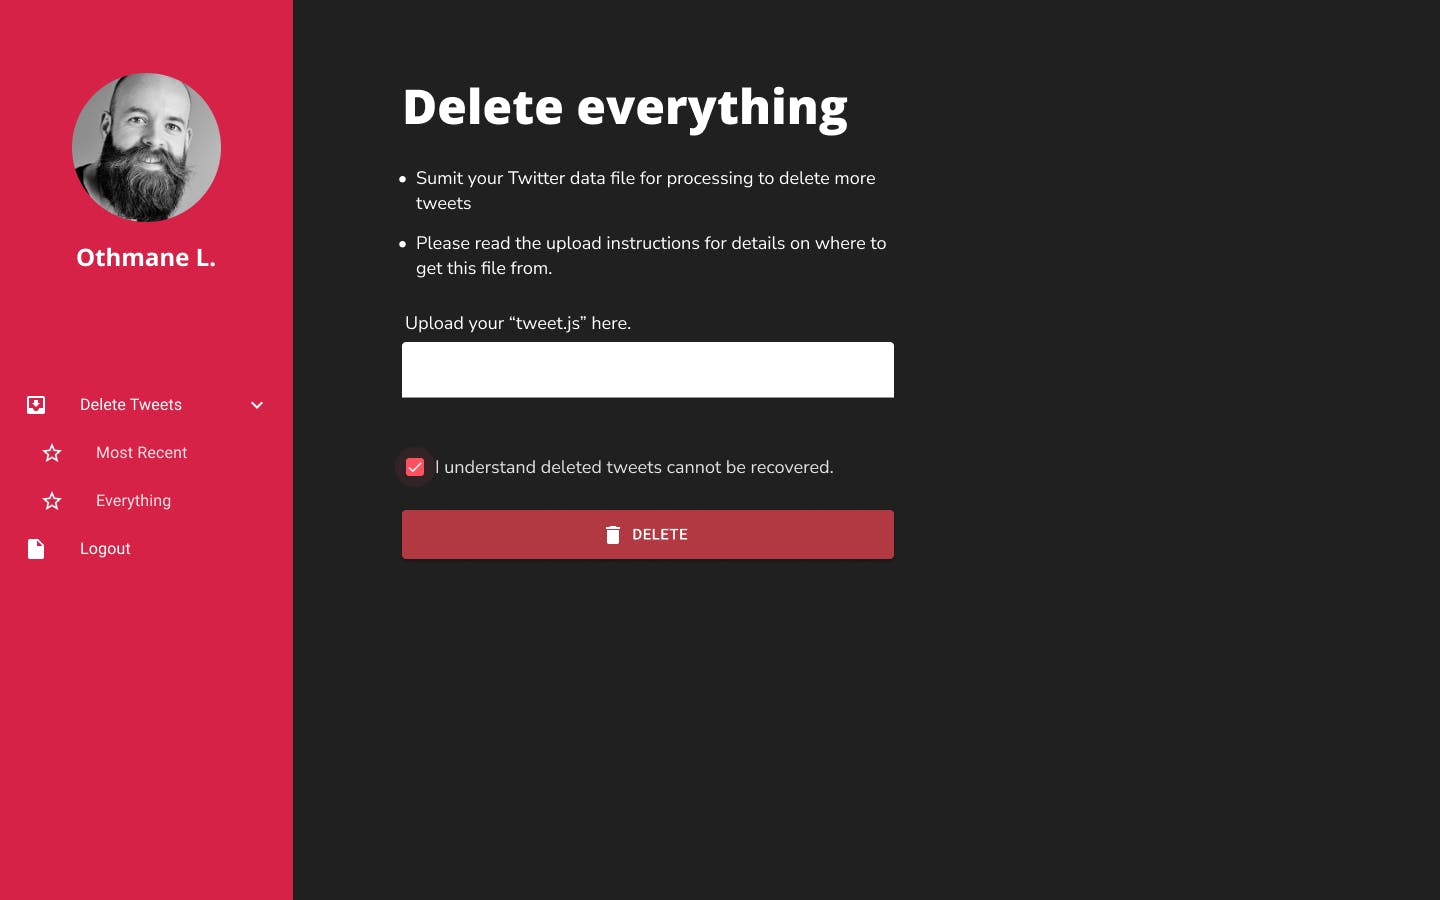
The screen that appears when the user clicks on "Everything"
These mockups provided the clarity needed for me to start working on Twiginity, but as I would learn later, the devil is in the details, and as I was coding and getting into the nooks and crannies of each feature, many new details I hadn't thought of surfaced.
Tech Stack 🛠️
Front-end
Back-end
Node
Express
Deployment
Initially I was planning on getting a VPS from Hostinger because I wanted to have root access to customize anything I wanted (database, nginx, php version, redis server, etc...), I also wanted to host my future personal website and other portfolio items on there as well.
A friend of mine convinced me (pretty easily) to try Heroku's free tier package. And after some reading, I went through my code again, rewriting some parts to get it production-ready.
I hooked Heroku to Twiginity's repo and added a script that would start building my app automatically right after commit.
❌ 1st commit
App failed to run because one of the dependencies stream-replace-string had to be compiled into a commonJS module before usage.
- I created a helper script and added it to
heroku-postbuildso that the compiling would happen right after all the dependencies have been installed.
❌ 2nd commit
Twiginity failed to run because one of the dependencies (morgan) was missing, although I was pretty sure I never deleted it.
Turns out, that when Heroku build your apps and installs your dependencies, it uninstalls the dev ones right after, which explains the "missing dependency" error.
- Since I had no more use for that dependency, I just deleted it from my code and my
package.jsonfile.
✅ 3rd commit
Still no luck getting the app to run, because Heroku could not manage to bind the app to a port.
- All I had to do though was to rename the PORT env variable to
PORTso my app could use the port number assigned by Heroku.
Twiginity's main features
Authentication
To use the app, the user has to sign in with Twitter.
Backend
The authentication is handled on the backend with passport through these different endpoints:
/auth/twitter— authenticate via passport twitter/auth/login/success— returns login success response with user information/auth/login/failed— returns login failed message/auth/logout— log-out and redirects to client home page/auth/twitter/redirect— redirect to "Most Recent" screen if login succeeded or redirect to homepage if failed
Once the user clicks on the Sign in with Twitter button, his profile picture, his username, his Twitter ID and his tokens are fetched during the OAUTH login flow, then the tokens are encrypted before everything is stored in a MongoDB database.
When the login is successful, the user is redirected to the "Most Recent" page and cookies are set.
Frontend
On the frontend, the authentication data and methods are made available through a context provider that wraps around the whole app.
    <AuthProvider>
      <App />
    </AuthProvider>
You can find below the code making up AuthProvider
export function AuthProvider({ children }) {
  const [authenticatedUser, setAuthenticatedUser] = useState({
    authenticated: null,
    user: null,
  });

  const { authenticated } = authenticatedUser;

  const twitterId = authenticatedUser?.user?.twitterId;

  useEffect(() => {
    fetch("/auth/login/success", {
      method: "GET",
      credentials: "include",
      headers: {
        Accept: "application/json",
        "Content-Type": "application/json",
        "Access-Control-Allow-Credentials": true,
      },
    })
      .then((response) => {
        if (response.status === 200) return response.json();
        throw new Error("failed to authenticate user");
      })
      .then((responseJson) => {
        const authInfo = {
          authenticated: true,
          user: responseJson.user,
        };
        setAuthenticatedUser(authInfo);
      })
      .catch((error) => {
        setAuthenticatedUser({
          authenticated: false,
          error: "Failed to authenticate user",
        });
      });
  }, []);

  const socket = authenticated
    ? io({
        autoConnect: false,
        query: {
          twitterId,
        },
      })
    : null;

  const handleSignInClick = () => {
    window.open("/auth/twitter", "_self");
  };

  const handleLogoutClick = (e, expired = false) => {
    expired
      ? window.open(`/auth/logout?session=expired`, "_self")
      : window.open(`/auth/logout`, "_self");
    handleNotAuthenticated();
  };

  const handleNotAuthenticated = () => {
    socket.disconnect();
    setAuthenticatedUser({ authenticated: false });
  };

  return (
    <AuthContext.Provider
      value={{
        authenticatedUser,
        handleLogoutClick,
        handleSignInClick,
        socket,
        handleNotAuthenticated,
      }}>
      {children}
    </AuthContext.Provider>
  );
}
When the app is loaded the first time or refreshed, a request is sent to /auth/login/success. If the request is signed with a cookie, then a 200 response is received, the user auth status is set to true and a socket is instantiated.
Protected routes
To use the the app's features, you need to be logged in. Which means that access to "Most Recent" and "Everything" should be restricted to signed in users only.
To make that happen, I created a component named RequireAuth that I wrapped around components I wanted to protect.
<Route exact path='/delete-everything' element={ <RequireAuth><DeleteEverything /></RequireAuth>} />
This component checks whether the user is authenticated before rendering the children.
⚠️ Issue with routing
When trying to access one of the protected routes from the address bar, I always ended up being redirected to the homepage.
This was due to my initial auth state being set to false inside AuthProvider, which meant that RequireAuth was rendering the unauthenticated route before AuthProvider's useEffect had a chance to run and set my auth status to true.
export function RequireAuth({ children }) {
  let {
    authenticatedUser: { authenticated },
  } = useAuth();

  return authenticated ? children : <Navigate to='/' />;
}
✅ Solution
I set the initial auth status to null and then rewrote RequireAuth so as to not render anything until useEffect runs thus setting the auth state and triggering a rerender.
export function RequireAuth({ children }) {
  let {
    authenticatedUser: { authenticated },
  } = useAuth();

  return authenticated === null ? null : authenticated ? children : <Navigate to='/' />;
}
Log user out on unauthenticated request
When the user signs in with Twitter, a cookie is created and stored with his ID and every subsequent request made is signed with that cookie before getting sent to the backend.
The backend then makes a request to Twitter with the API keys and access tokens. These tokens never expire UNLESS you revoke Twiginity's permissions or deactivate your account.
But if any of those two scenarios happen, an issue arises.
⚠️ Issue
Say you logged in to use Twiginity and then decided to deactivate your account or revoke permissions once you were done.
a Twiginity session is 24h long, so if you forgot to delete some tweets and came back to use it, you would find yourself still logged in, but any attempt to delete tweets or upload a file would result in errors because the requests you'd be making to the Twitter API would be using expired tokens.
✅ Solution
To fix that, I added inside each route a simple request to the Twitter API that fetches the ID of the pinned tweet. If that request goes through then the rest of the code will go through, if that request fails with a status code 401 then an error is thrown inside the try/catch block.
await client.v2.me({ expansions: ["pinned_tweet_id"] });
A 401 error triggers the handleLogoutClick function that initiates the logout sequence by logging the user out thanks to passport, disconnecting the socket instance and setting auth status to false in the AuthProvider.
axios
      .delete("/tweets/delete-recent-tweets", {
        data: { time: pastTime, keyword },
        withCredentials: true,
      })
      .then((response) => {
        setState(response.data);
      })
      .catch((error) => {
        if (error.response.status === 401) {
          return handleLogoutClick(undefined, true);
        }
        setState({ type: deletionState.error, message: error.response.data.message });
      });
  const handleLogoutClick = (e, expired = false) => {
    expired
      ? window.open(`/auth/logout?session=expired`, "_self")
      : window.open(`/auth/logout`, "_self");
    handleNotAuthenticated();
  };

  const handleNotAuthenticated = () => {
    socket.disconnect();
    setAuthenticatedUser({ authenticated: false });
  };
Job Queue
The concept of job queue was new to me and I would have probably never thought of it if the app was for my use alone. But as I started thinking about Twiginity being used by multiple users, a lot of questions started to surface.
One of those questions being "How can I handle servicing multiple users?" knowing that if just one person decided to delete thousands of tweets, she would block the app's use for everyone else.
I needed to make the deletion process async but more importantly, I needed to respect the hierarchy by queuing upcoming tweets. Some googling lead me to discover job queues, and that's how I ended up using Bull.
⚠️ Issue 1
I set up my queue processor function to console.log and broadcast through a socket connection the index of each tweet, just to check if everything was working. But to my surprise, some tweet indexes were skipped. Upon checking the queue, I found out that those tweets were processed, but that no event was emitted.
For instance out of 20 tweets, here is the output I'd get:
tweet 1
tweet 3
tweet 5
tweet 7
tweet 9
tweet 11
tweet 13
tweet 15
tweet 17
tweet 19
Which was very problematic, because my frontend was expecting to receive the last tweet event to trigger the frontend's state update, which meant that for that to happen, I needed events to be emitted reliably.
✅ Solution 1
I looked up the issue online but to no avail. During my troubleshooting, I disabled any dependency I thought could be the culprit: nodemon, socket.io, etc... same result.
I decided to give up on Bull and to try another queue manager, bee-queue. The syntax and requirements were almost identical, which made replacing bull very easy. And TADA! it worked. All the job events were properly and reliably emitted.
⚠️ Issue 2
When working on transmitting updates to the frontend through the use of sockets, I wrapped a setTimeout function inside a promise to simulate an async operation.
Concurrency on Twiginity was set to 1 which meant that the queue was processing one job at a time and progress was reported correctly.
Progress was calculated this way Math.round(((index + 1) / numberOfTweets) * 100) and sent to the frontend to update the progress bar.
const awaitTimeout = (delay) => new Promise((resolve) => setTimeout(resolve, delay));

 const deletionProcess = async (
   { data: { tweetId, tokens, twitterId, numberOfTweets, index, socketId } },
   done
 ) => {
   await awaitTimeout(1000);
   try {
     console.log(index + 1);
     io.to(socketId).emit("deleting", {
       type: "deleting",
       progress: Math.round(((index + 1) / numberOfTweets) * 100),
       tweetNumber: index + 1,
     });

     done(null, index + 1);
   } catch (error) {
     io.to(socketId).emit("deleting", {
       type: "deleting",
       progress: Math.round(((index + 1) / numberOfTweets) * 100),
       tweetNumber: index + 1,
       deleteError: `Tweet ID -> ${tweetId} could not be deleted.`,
       error: error.message,
     });

     done(error);
   }
 };
Since we're dealing with requests here, I upped bee's concurrency to 10 and replaced the setTimeout function with the real Twitter API call.
The result was that sometimes the progress bar would never reach 100%, which was odd because all jobs were processed when I checked my Redis queue. And since I was still logging the index of each tweet to the console, I realized that since these operations are async, each one was returning at a different time, and not necessarily in order. which meant that I could get 100% as a progress value and then 90% just after.
✅ Solution 2
I needed a way to calculate the progress made, whether the tweet was deleted or not. Since all the jobs were being reported correctly now, and the only remaining issue was order, I decided to transfer the progress calculations to the frontend.
const awaitTimeout = (delay) => new Promise((resolve) => setTimeout(resolve, delay));

const deletionProcess = async (
  { data: { tweetId, tokens, twitterId, numberOfTweets, index, socketId, username } },
  done
) => {
  const twitterClient = new TwitterApi({
    appKey: process.env.API_KEY,
    appSecret: process.env.API_SECRET_KEY,
    accessToken: tokens.accessToken,
    accessSecret: tokens.accessTokenSecret,
  });
  try {
    console.log(index + 1);
    await twitterClient.v1.deleteTweet("1498397214393122823");
    io.to(socketId).emit("deleting", {
      type: "deleting",
      numberOfTweets,
      increment: 1,
    });

    done(null, index + 1);
  } catch (error) {
    console.log(error.code);
    if (error?.code === 404) {
      io.to(socketId).emit("deleting", {
        type: "deleting",
        numberOfTweets,
        increment: 1,
        tweetId,
        deleteError: "notFound",
        error: error.message,
      });
      return done(error);
    }
    io.to(socketId).emit("deleting", {
      type: "deleting",
      numberOfTweets,
      increment: 1,
      tweetId,
      username,
      deleteError: "anotherError",
      error: error.message,
    });

    done(error);
  }
};
<ProgressBar
               messages={state?.deleteError}
               tweetsProcessed={state.increment}
               numberOfTweets={state.numberOfTweets}
/>
<LinearProgressWithLabel
         value={Math.round((tweetsProcessed / numberOfTweets) * 100)}
/>
Progress bar and different states
As the features started taking shape, I started thinking more and more from a user's POV. Again, if the app was for my use alone, I could have gotten away with many things, but I wanted Twiginity to be used by anyone with a Twitter account, and that meant making it as user-friendly possible.
When the user clicks on "Delete tweets", a backdrop shows up indicating how many tweets are about to be processed. If another user's tweets are already queued, then the app will let you know that you can safely close the window as Twiginity will process your tweets when the time comes.
Once the queue starts processing your tweets, updates are received through the socket connection, and progress is reflected on the progress bar.
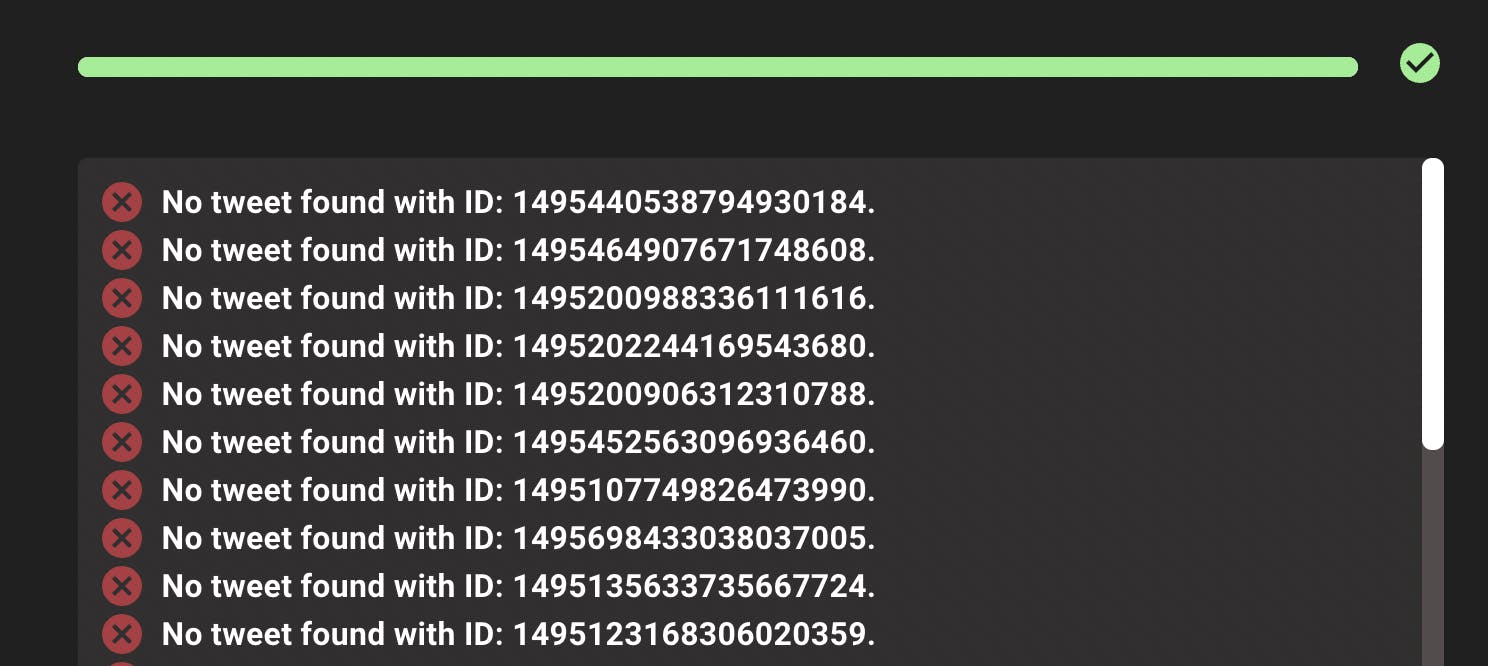
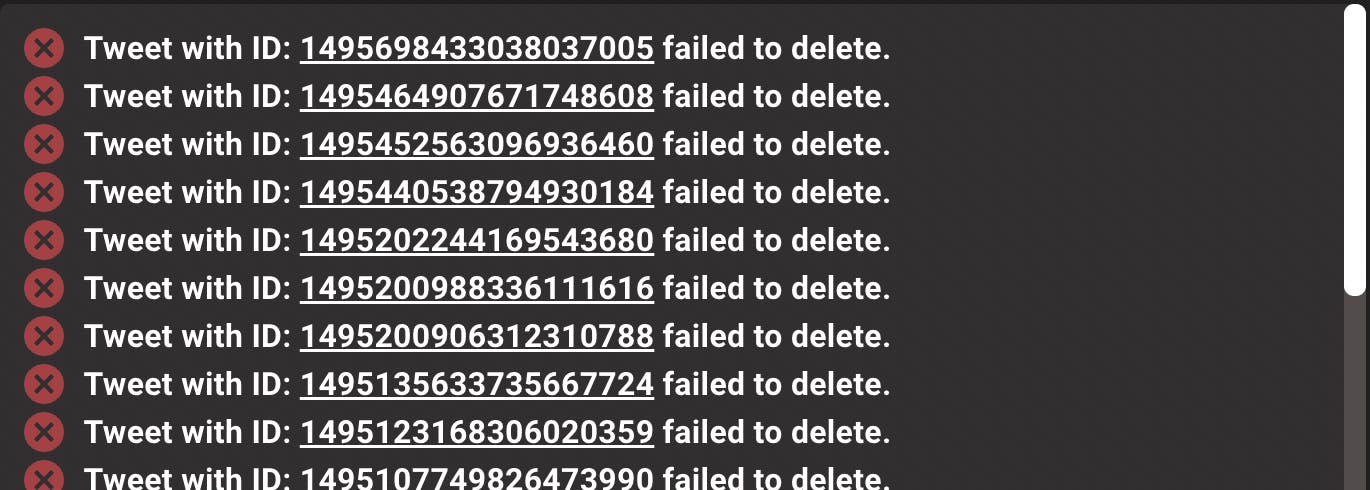
If any error occurs, a field will display the error as well as the tweet where the error originated from.
Errors fall into two types:
tweet cannot be found because it might have already been deleted.
tweet could not be deleted because of some unknown issue (connectivity, rate limit, etc...) in which case, a clickable link to the tweet is displayed.
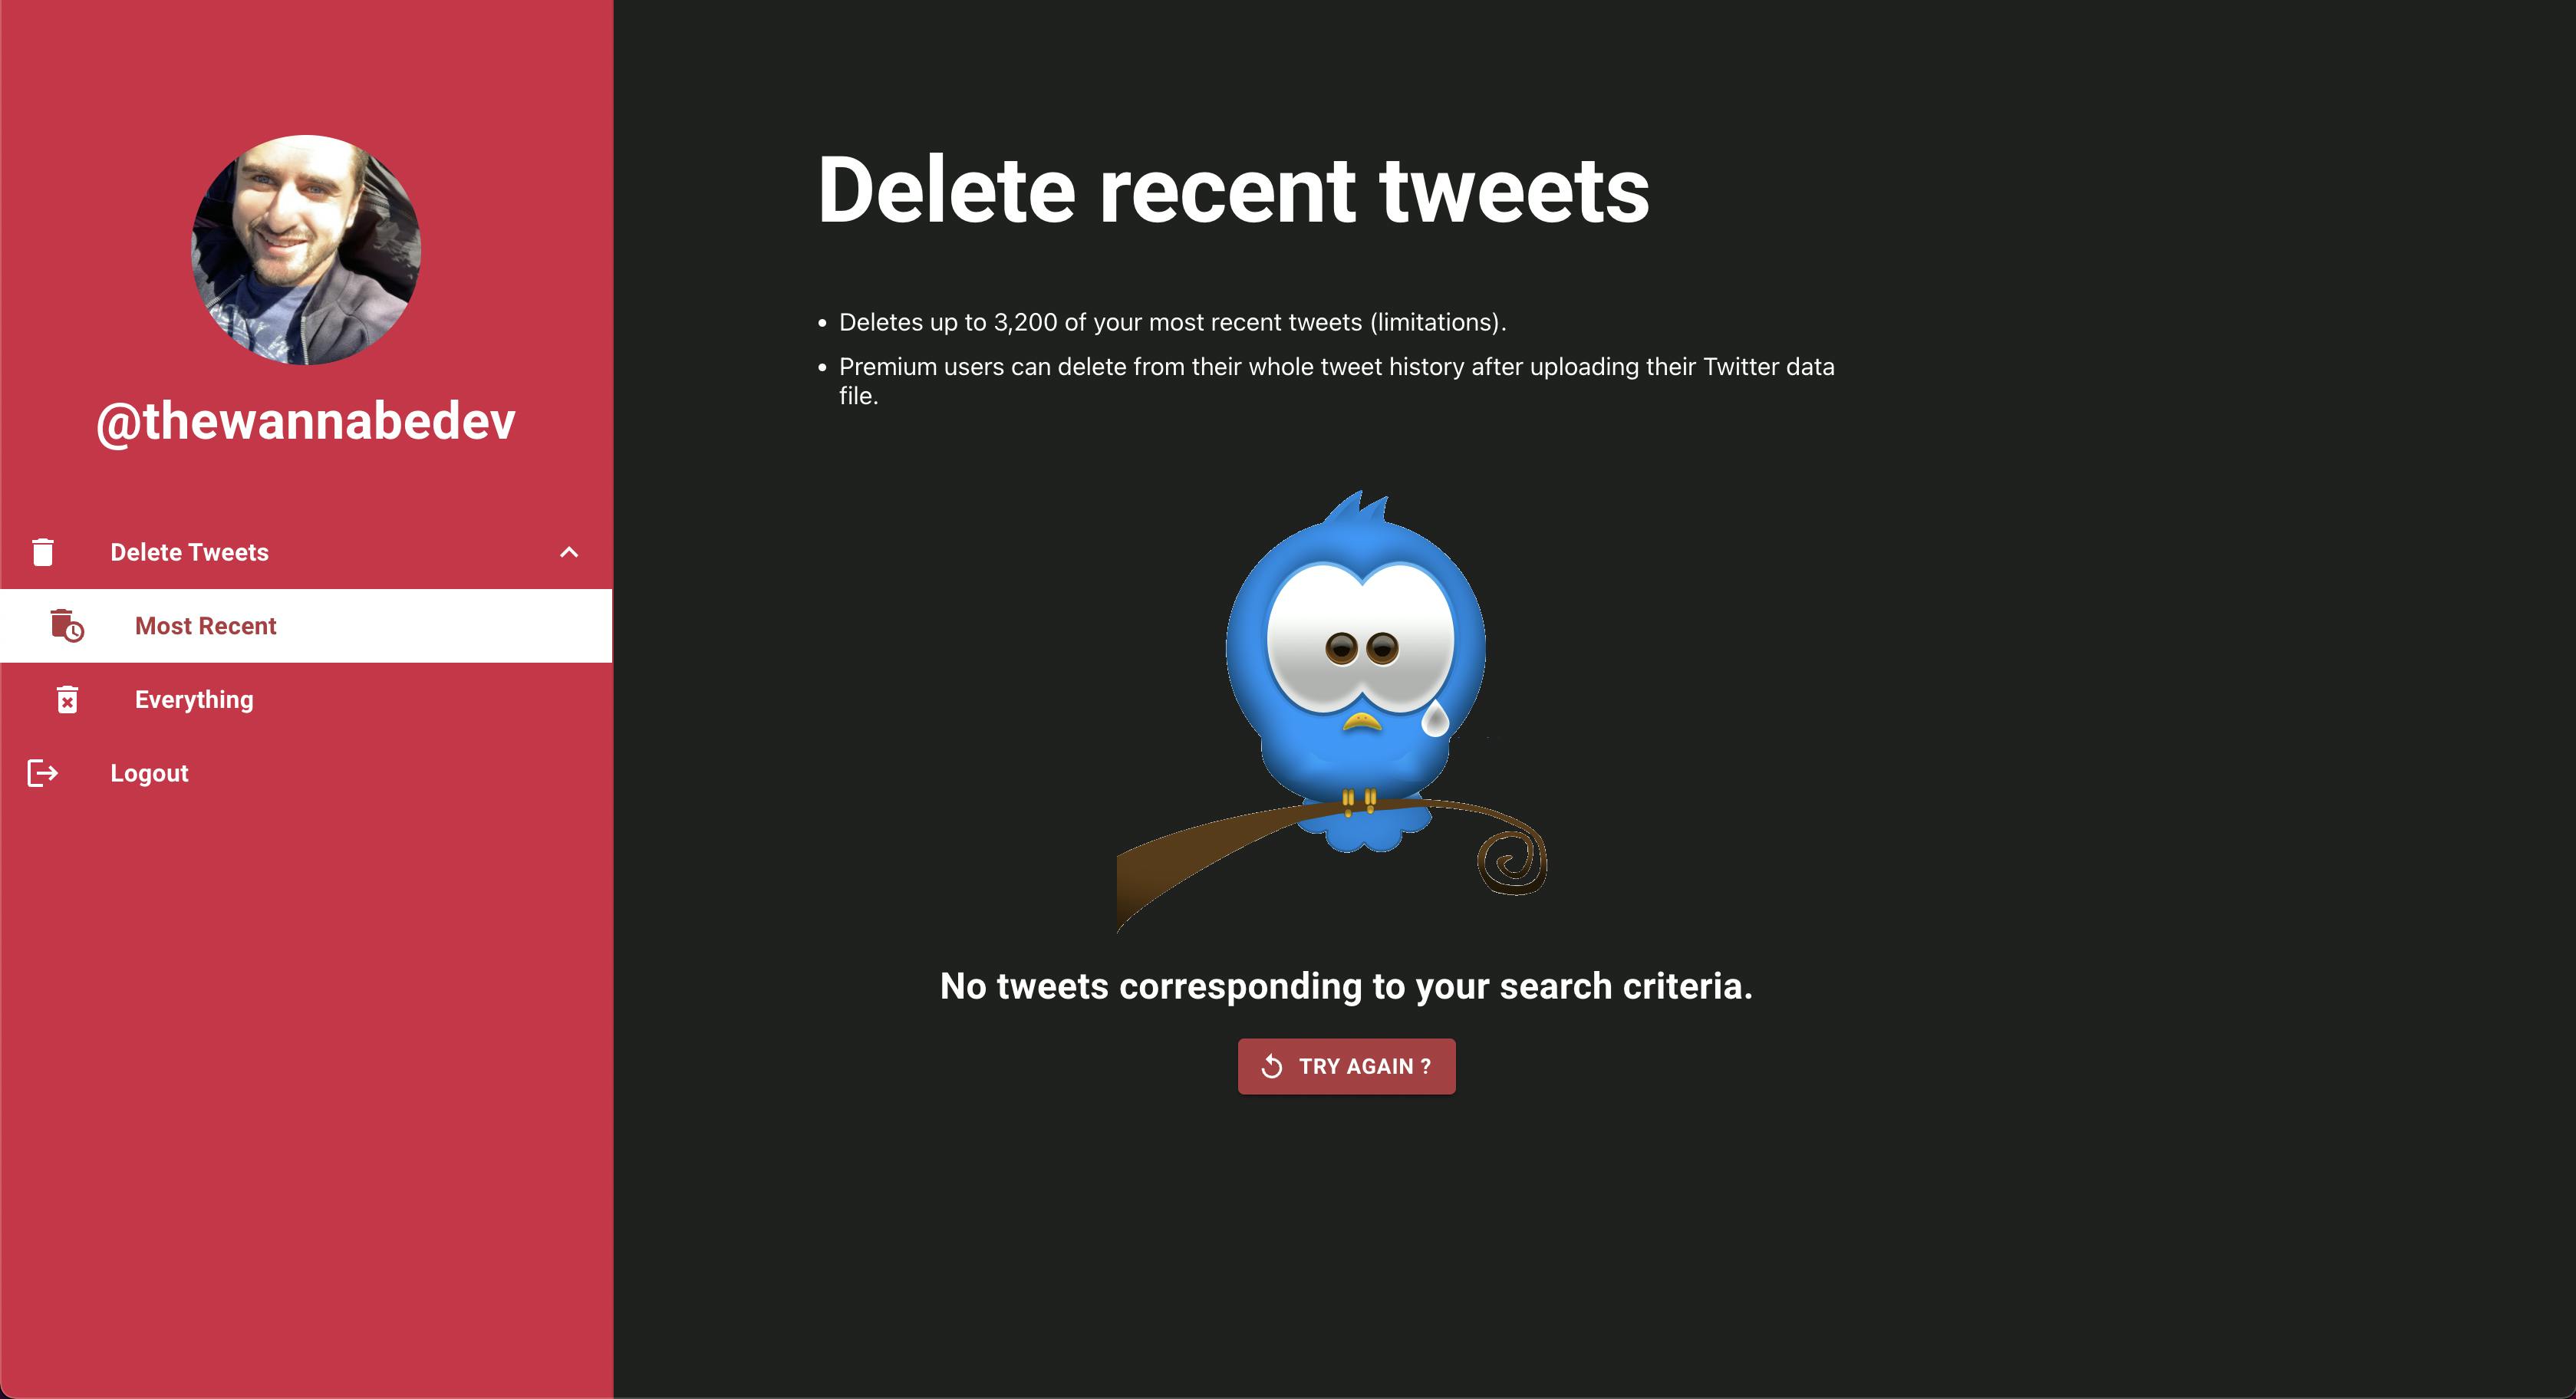
If you're trying to delete some of your recent tweets and none are found that correspond to your criteria, then this message shows up:
File upload
Frontend
I always found drop zones intuitive. And that's how I ended up using filepond. The package was packed with useful options.
I set up filepond to accept only JS files not exceeding 100mb and the whole page can be used to drop the file instead of just the drop zone.
Backend
In the backend, I used a packaged called express-fileupload and configured it with the following options
fileUpload({
      useTempFiles: true, // use temp files instead of RAM
      tempFileDir: "../../tmp/",
      parseNested: true, // parse the whole req.files object
      createParentPath: true, // create directory if it doesn't exist
      debug: true,
})
Filepond starts uploading the file as soon as it is dropped or selected and once the upload is finished, the user can click on the "Delete tweets" button.
The file size and file type checks happen in the frontend before the file is sent.
Issue
Later when Twignity was published, I open it on Safari to show it to a friend, and as I was trying to delete my own tweets using a tweet.js file, filepond returned an error saying the file type was not valid. (going through the same steps on Chrome worked as expected)
I learned through some googling that some browsers fail to detect file type correctly.
Solution
Thankfully, filepond comes with a plugin FilePondPluginFileValidateType that allows you to set up custom filetype checks:
fileValidateTypeDetectType={(source, type) =>
        new Promise((resolve, reject) => {
          if (/\.js$/.test(source.name)) {
            return resolve("text/javascript");
          }
        })
      }
This allows the FileUploader component to perform its own check and provide the browser with the correct filetype.
Twitter Client as middleware
- twitter-api-v2 as middleware To make requests to the Twitter API, I resorted to an awesome package called
twitter-api-v2, to use it, you just have to instantiate a client with the API KEYS and ACCESS TOKENS.
Those access tokens are only available for use inside routes because passport loads the user data inside req.user. All I had to do was create a middleware function.
const { TwitterApi } = require("twitter-api-v2");

function twitterClient(req, res, next) {
  req.twitterClient = new TwitterApi({
    appKey: process.env.API_KEY,
    appSecret: process.env.API_SECRET_KEY,
    accessToken: req.user.tokens.accessToken,
    accessSecret: req.user.tokens.accessTokenSecret,
  });

  next();
}
And add it to my routes
tweetsRouter.delete("/delete-tweet-js", isAuthenticated, twitterClient, deleteTweetJs);
Sockets
The idea of using sockets came to me when I was trying to find a way to send updates to the frontend. With Node/Express once a response was sent, it was final... but I needed to update the user on the progress of the operation 🥺
That's how I stumbled initially on server-sent events which I quickly discarded because besides the fact that they only work with GET requests, most of my updates were going to be send from inside jobs in the queue and not from within the route.
Socket.io ended up being the perfect solution to my problem, here is how I set it up:
when the user logs in, a socket is created on the frontend but no connection is made.
when the user navigates to "Most Recent" or "Everything", the socket instance establishes a connection with the backend.
once a connection is established, an entry is created under the
userhash in the Redis database associating the user's Twitter ID with the socket ID.this socket ID is fetched inside the express routes based on the Twitter ID initiating the operation and then sent as part of the job data to the job queue, so that when each job/tweet is processed, the update is sent to the right user.
function addArrayOfTweetsToJobQueue(
  arrayOfTweets,
  tokens,
  twitterId,
  username,
  socketId,
  addToQueueFunction
) {
  for (const [index, tweet] of arrayOfTweets.entries()) {
    const id = tweet?.tweet?.id === undefined ? tweet.id : tweet.tweet.id;

    const jobData = {
      tweetId: id,
      tokens,
      twitterId,
      username,
      numberOfTweets: arrayOfTweets.length,
      index,
      socketId,
    };
    addToQueueFunction(jobData);
  }
}
Deleting recent tweets
What happens when the Delete tweets button is pressed ?
Twiginity grabs the current time and subtracts the duration chosen by the user which results in a new date that gets converted to ISO format.
the date along with a keyword (if provided) are sent to the backend.
Inside the route, we then fetch the Twitter API and retrieve the tweets starting from the provided date.
Once that's done, we transform both the keyword and the tweets to lowercase and then filter the array of tweets keeping only the ones containing the keyword.
we loop through the array adding each tweet to the job queue.
we inform the user that his request has been processed successfully.
Deleting all tweets
- The user drops the file into the file uploader which instantly starts the upload process. In the backend, this translates into the file being uploaded and then renamed with the user's Twitter ID before getting moved to a specific folder.
What happens when the Delete tweets button is pressed ?
the form checks if a file was provided and uploaded before sending the request.
If somehow, the file got deleted in between the upload and pressing the
Delete tweetsbutton, another check inside the route makes sure the file exists before proceeding or throws an error.Once we make sure the file exists, the app checks whether it's the right file by searching for a specific string found in the first line.
This file contains an array of all the tweets about to be deleted, and to use it, we replace this string
window.YTD.tweet.part0 =with this onemodule.exports =enabling us to import the contents of the file.We can then loop through the array adding each tweet to the job queue.
Then, we inform the user that his request has been processed successfully.
Code and Demo 💻
If you'd like to check out the app, feel free to visit: https://twiginity.onrender.com/.
If you want to check out the code or run it locally, you can all the info and steps on my repo.
I'd appreciate all the feedback I can get about the app or anything really. 🙏 This app was months in the making, and with this article, I hopefully close this chapter and move on to the next. 😊